JWT ( Json Web Token)
At its core, JWT operates on the principle of stateless authentication, meaning that the server does not need to maintain any session state for authenticated users. Instead, when a user successfully logs in, the server generates a JWT containing relevant user information (known as claims) and signs it using a secret key. This JWT is then sent to the client, typically stored in local storage or a cookie.
Now this token is sent with every subsequent request and it can simply decode and verify the JWT using the same secret key used for signing.
This is a very simple explanation of how JWT works.
Now let's dive into coding.
Step 1 : Setting up the project in node
Initializing a node project.
npm init -y
Installing express, jwt and bcrypt (this library is used to hash password).
npm i express jsonwebtoken bcrypt
Before we do need anything we need to make a small change in the package.json file.
{
  "name": "jwt_auth",
  "version": "1.0.0",
  "main": "index.js",
  "type": "module", // we have added this line. It allows us to use import statement
  "scripts": {
    "test": "echo \"Error: no test specified\" && exit 1"
  },
  "keywords": [],
  "author": "",
  "license": "ISC",
  "description": "",
  "dependencies": {
    "express": "^4.19.2",
    "jsonwebtoken": "^9.0.2"
  }
}
Setting up a very basic express server. For this we create a index.js file and write the following code:
// Importing required modules
import express from "express";

// Creating an instance of Express
const app = express();

// middleware to parse incoming requests with JSON payloads
app.use(express.json());

// Define a route handler for the root path
app.get("/", (req, res) => {
  res.send("Hello, World!"); // Sending a simple response
});

// Define a port to listen on
const port = 3000;

// Start the server
app.listen(port, () => {
  console.log(`Server is running on http://localhost:${port}`);
});
Now if we run the server and go to localhost:3000 we should get the response.
// to run the server
node index.js

In this initial phase, we've established the foundation of our Node.js server. Moving forward, we'll progressively construct distinct routes for login, logout, and registration functionalities. Additionally, we'll integrate the intricate logic of authentication seamlessly into our system.
Step 2 : Creating Login Route
First let's create a controller folder where we can store the controller functions. In this project I will not be making a dedicated routes folder and I will not integrate a database as well. We will use a db.json file to replicate a database.
// db.json
{
  "users": [
    {
      "id": "1",
      "username": "john_doe",
      "email": "john@example.com",
      "password": "$2a$10$WTAHnTzMSXoG0bd/t.v27u2W8Si8S3HM3IfzXZ6Dn9UxLpxT/Axx."  // password123
    },
    {
      "id": "2",
      "username": "jane_smith",
      "email": "jane@example.com",
      "password": "$2a$10$pCFm2rK4TEwwzYeZKNnih.HJ95UI6nf3uFKPA5qQe9AmEtos.EpLO"  // secret456
    },
    {
      "id": "3",
      "username": "sam_wilson",
      "email": "sam@example.com",
      "password": "$2a$10$0/huV5E58VQYl20kSwN6ZuDLw7HtYQ9LXaIFn.qa51XMS8s26H/TW"  //qwerty789
    }
  ]
}
So the login route will be a post route since we have to send information to the server.
// index.js
...
import { Login } from "./controller/UserController.js";
...
// login route
app.post("/users/login", Login);
// controllers/UserController.js
import fs from "fs";
import bcrypt from "bcrypt";
import jwt from "jsonwebtoken";

export const Login = (req, res) => {
  const { email, password } = req.body;

  fs.readFile("db.json", "utf8", (err, data) => {
    if (err) {
      console.log(err);
      res.status(500).send("Internal Server Error");
      return;
    }

    const jsonData = JSON.parse(data);

    const index = jsonData.users.findIndex((user) => user.email === email);

    // checking if the user exist i.e. if the user is already registered
    if (index === -1) {
      res.status(400).send("Email does not exist.");
      return;
    }

    const user = jsonData.users[index];

    // checking if the password is correct
    const isPasswordCorrect = bcrypt.compareSync(password, user.password);

    if (!isPasswordCorrect) {
      res.status(400).send("Incorrect Password");
      return;
    }

    // generating token, since password and email is correct
    const token = jwt.sign({ userId: user.id }, "secret12345", { // the "secret12345" should be complex string and should be stored in an environment variable
      expiresIn: 3 * 24 * 60 * 60, // 3 days
    });

    res.cookie("jwt", token, {
      // sending the token in cookie
      httpOnly: true,
      maxAge: 3 * 24 * 60 * 60 * 1000, // 3 days in milliseconds
    });

    res
      .status(200)
      .json({ message: "user logged in", success: true, user: user.id });
  });
};
The Login function is generally an async function. But since we are not using an actual database, this function can be a normal function.
Ok let's understand this login function.
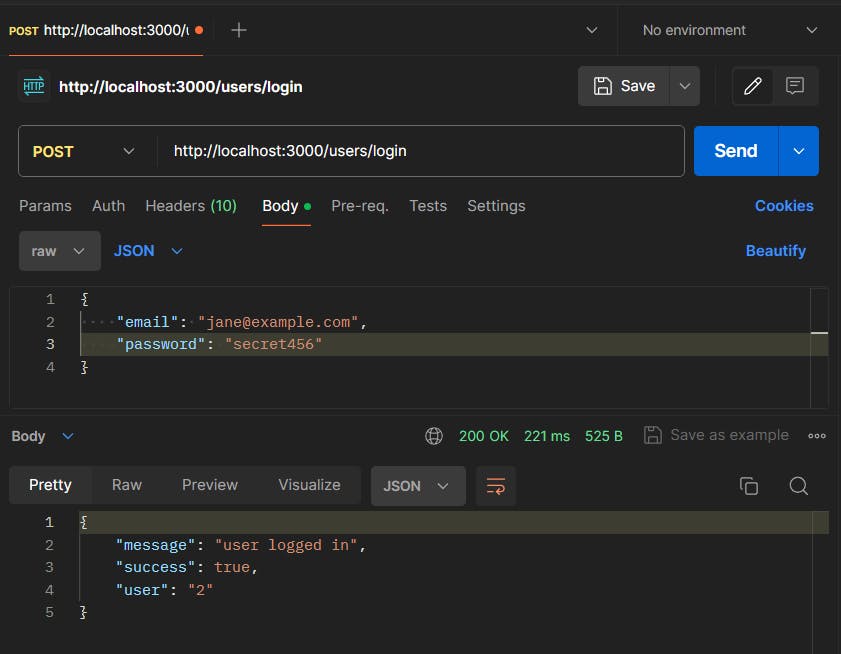
First the server is receiving the email and the password of the user that is trying to log in.
Next the server checks if the user is registered by checking the given email exists in the database.
Next it is comparing the given password with the stored hashed password. We never store plain password in the database. We always hash it and store the hashed value at the time of registration. And we are using the bcrypt library to do all this.
Next if everything is correct we create the token and send it in the cookie.
To test this login route, we can use Postman.

Step 3 : Creating Registration Route
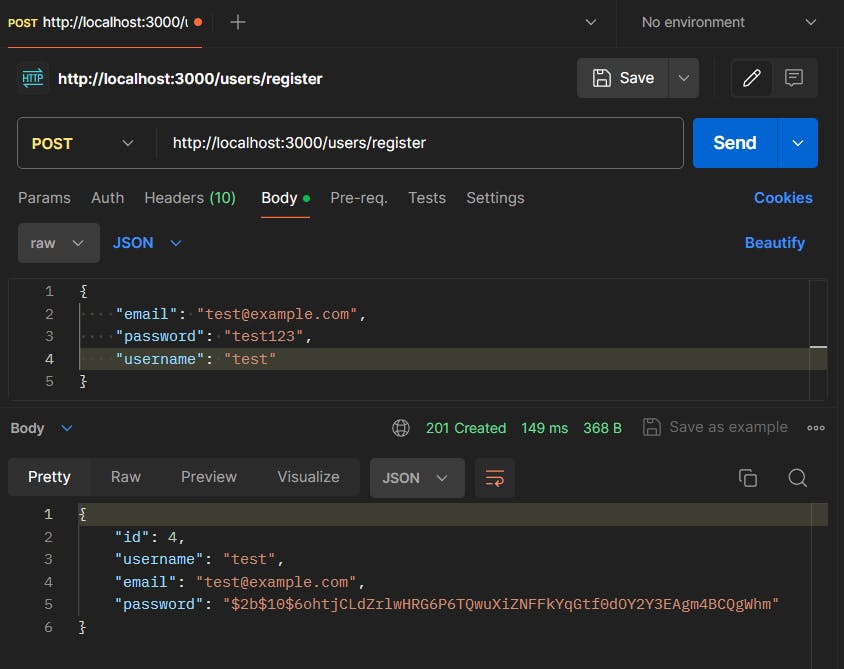
Similar to the login route the register route will also be a post route.
// index.js
...
// registration route
app.post("/users/register", Register);
...
// /controller/UserController.js
export const Register = (req, res) => {
  const { email, password, username } = req.body;

  if (!email || !password || !username) {
    res.status(400).send("Insufficient User Information");
    return;
  }

  // you can provide custom function for checking if the password is strong enough
  // hashing the password
  const salt = bcrypt.genSaltSync(10);
  const hashedPassword = bcrypt.hashSync(password, salt);

  fs.readFile("db.json", "utf8", (err, data) => {
    if (err) {
      console.log(err);
      res.status(500).send("Internal Server Error");
      return;
    }

    const jsonData = JSON.parse(data);

    const maxId = jsonData.users.reduce(
      (acc, curr) => Math.max(acc, curr.id),
      0
    );

    const newUser = {
      id: maxId + 1,
      username,
      email,
      password: hashedPassword,
    };
    jsonData.users.push(newUser);

    fs.writeFile("db.json", JSON.stringify(jsonData), (err) => {
      if (err) {
        console.log(err);
        res.status(500).send("Internal Server Error");
        return;
      }

      res.status(201).json(newUser);
    });
  });
};
Here also we are following the same flow: getting the data -> hashing the password -> storing the new user in the database.

Step 4 : Creating Logout Route
The logout route can be implemented as a basic GET route since it does not involve sending any data to the server.
// index.js
...
// lougout route
app.get("/users/logout", Logout)
...
In the Logout function we need to simply delete the cookie with the token that we set during the login function. However, it is not possible to directly delete a cookie. To address this, we can set the cookie's value to an empty string and ensure it expires within a millisecond as a workaround.
// controllers/UserController.js
export const Logout = (req, res) => {
  res.cookie("jwt", "", {
    maxAge: 1,
  });
  res.status(200).send("User logged out");
};
Step 5 : Creating a middleware
Next we need to create a middleware that will protect every route that needs the user to be logged in.
So what happens is the token that we set in the cookies is sent with every request to the server. In this middleware we need to verify the token. If the token is verified we can move forward with the request and if not then that request gets terminated and an error response is sent.
// middleware/authMiddleware.js
import jwt from "jsonwebtoken";

// Middleware function to verify JWT token
export const authenticateToken = (req, res, next) => {
  // Extract the JWT token from the request headers
  const authHeader = req.headers["authorization"];
  const token = authHeader && authHeader.split(" ")[1];

  // If token is not provided, send 401 Unauthorized response
  if (token === null) {
    return res.status(401).json({ message: "Unauthorized" });
  }

  // Verify the token
  jwt.verify(token, "secret12345", (err, user) => {
    if (err) {
      // If token is invalid or expired, send 403 Forbidden response
      return res.status(403).json({ message: "Forbidden" });
    }
    // If token is valid, attach the user object to the request for use in route handlers
    req.user = user;
    next();
  });
};

export default authenticateToken;
In this authenticateMiddleware function we are first retrieving the token from the headers. If the token does not exist we are terminating the request. Then we are verifying the token and if there is an error in verifying the token we are again terminating the request. If everything is fine we are attaching the user object to the request which can be accessed for use in the protected route.
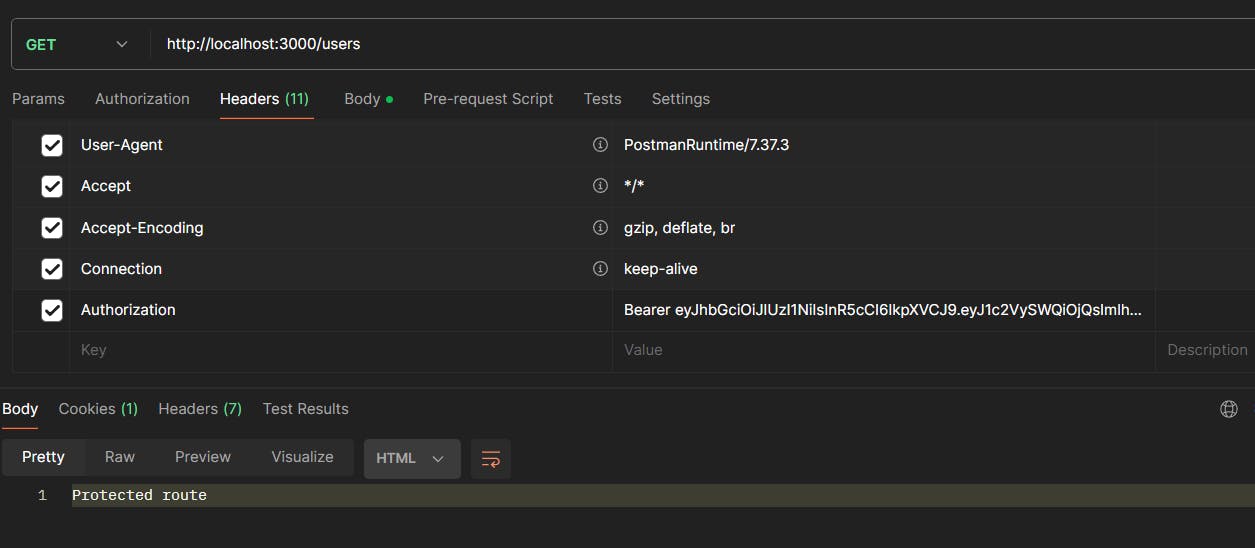
Now to test this in postman we need to create the authorization header manually. Although in the browser this is done automatically.

In the Headers tab set the key value pair like this. NOTE - there should be a space between "Bearer" and "Token-Value".

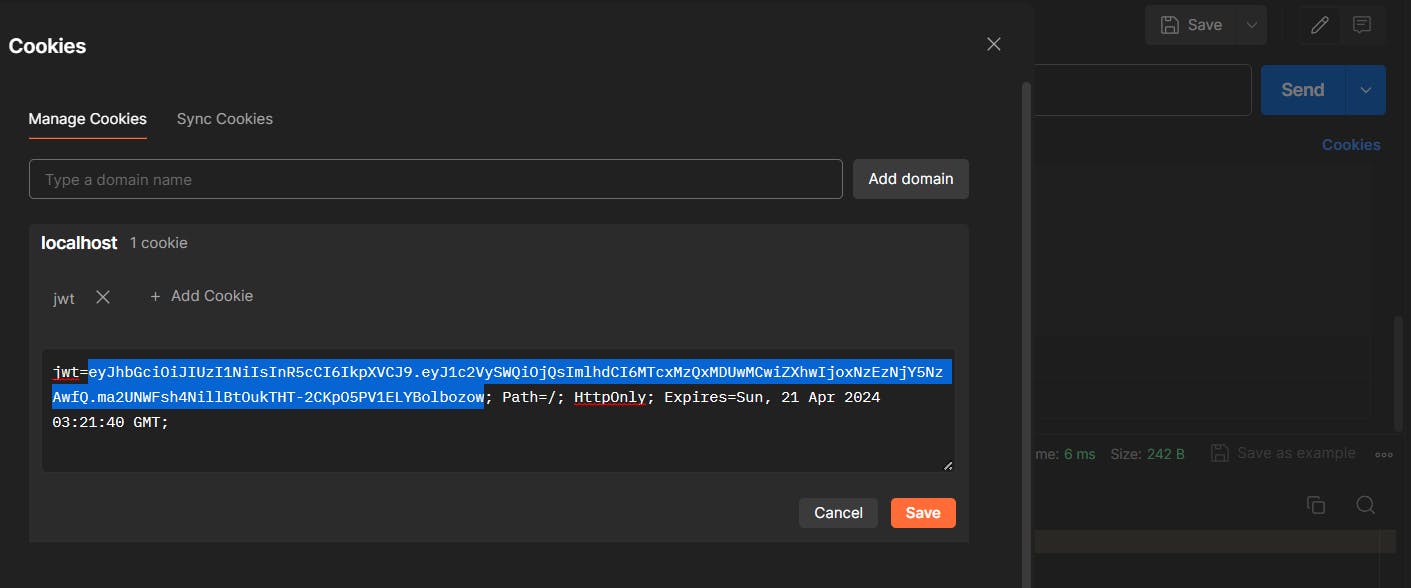
Now to get the token value go to cookies and then press jwt and then copy the value.
Next We must create a route that we need to protect and use the middleware there.
// index.js
...
// Route to protect
app.get("/users", authenticateToken, (req, res) => {
  res.send("Protected route");
});
...
Now finally if we send a get request to localhost:3000/users we get the response. And everything works fine.

Conclusion
In conclusion, the implementation of authentication in Node.js using JWT involves setting up a server, creating login, registration, and logout routes, as well as establishing a middleware for protecting routes that require user authentication. By following the step-by-step guide provided, developers can effectively integrate JWT-based authentication in their Node.js applications, ensuring secure communication between clients and servers.
The final code for this project can be found in this github repo: here
Connect with me on LinkedIn to stay updated on my latest projects and insights, or visit my Portfolio website to learn more about my work and expertise.
Thank you for coming along on this adventure of creating an authentication API with Express, Node.js, and JWT. I trust you discovered this guide to be useful and enlightening. Just a reminder, the realm of web development is wide and thrilling, so continue exploring, learning, and crafting incredible things!
Happy coding! 🚀
