Table of contents
First let's get done with the theory:
What is Node.js ?
Node.js is a powerful, open-source, cross-platform JavaScript runtime environment built on Chrome's V8 JavaScript engine. It allows developers to run JavaScript code on the server-side, enabling the development of scalable, high-performance web applications. In simple terms, Node.js enables developers to execute JavaScript code on the server-side, independent of any web browser environment.
What is Express.js ?
Express is a minimalist and flexible web application framework for Node.js. It provides a robust set of features for building web applications and APIs, including routing, middleware, template engines, and much more. Express simplifies the process of building web servers and handling HTTP requests and responses, allowing developers to focus on writing clean, modular, and maintainable code. It's widely used in the Node.js ecosystem and is known for its simplicity and extensibility.
Now let's dive into coding
Step 1 : Prerequisites
The only prerequisite is to have node installed in the system.
Node Download link: here
Step 2 : Setting up the project
We need to initialize a node project.
npm init -y
After running this command, a file named "package.json" is created. This files keeps track of all the dependencies or packages that we install for the project. In this project we are going to install Express.
npm i express
After running this command Express gets installed.
Finally we can start with creating the API.
Step 3 : Creating a basic server
Now we will create a file named index.js and write the following code in that file.
// Importing necessary modules
const express = require('express');

// Creating an Express application
const app = express();
const port = 3000; // Port number for the server to listen on

// Define a route handler for the root URL '/'
app.get('/', (req, res) => {
  res.send('Hello, World! This is the root URL.');
});

// Define a route handler for a custom URL '/greeting'
app.get('/greeting', (req, res) => {
  res.send('Hello! Welcome to my Express server!');
});

// Start the server and make it listen for incoming requests
app.listen(port, () => {
  console.log(`Server is listening at http://localhost:${port}`);
});
This is a very basic express server which has 2 routes namely "/" and "/greeting" and the server is listening for the requests in the specified port number - 3000 in our case.
node index.js
After saving the index.js file, if we run the above command the server gets started.
Now if we move to the url localhost:3000 in the browser we get the response for the "/" route and then if we move to url localhost:3000/greeting we get the response for the "/greeting" route.
Creating a todos API
Building upon our initial overview of Express and Node servers, we're now diving into crafting a complete TODOs API which will have the following functionalitites:
Getting todo items
Creating new todo items
Deleting new todo items
Updating a todo item
Step 4 : Creating the data
We need to create a file namely db.json that will store our todos and act as a database.
// db.json

{
  "todos": [
    { "id": 1, "todo": "Finish homework" },
    { "id": 2, "todo": "Buy groceries" },
    { "id": 3, "todo": "Call mom" },
    { "id": 4, "todo": "Go for a run" },
    { "id": 5, "todo": "Read a book" },
    { "id": 6, "todo": "Clean the house" },
    { "id": 7, "todo": "Write an article" },
    { "id": 8, "todo": "Attend a meeting" },
    { "id": 9, "todo": "Watch a movie" },
    { "id": 10, "todo": "Cook dinner" }
  ]
}
Now we can retrieve and manipulate this db.json file using the fs package.
Step 5 : Getting all the todos
To get all the todos we need to create a new get route - "/todos"
const fs = require("fs");
...
app.get("/todos", (req, res) => {
  fs.readFile("db.json", "utf8", (err, data) => {
    if (err) {
      console.log(err);
      res.status(500).send("Internal Server Error");
      return;
    }

    const jsonData = JSON.parse(data);

    res.status(200).json({
      todos: jsonData.todos,
      total: jsonData.todos.length,
    });
  });
});
Here we are retrieving the todos from the db.json file using the fs package and then in response we are sending the todos as well as the total number of todos.
Now if we make a request in the url localhost:3000/todos in the browser we should get the list of all the todos. But make sure to stop the node server and run it again.
Step 6 : Creating a new todo
For creating a new todo we need to create a new post route.
// index.js
...
app.use(express.json()); // this line is used so that we can send json objects to the server
                         // In this case we are sending a new todo
...
app.post("/todos", (req, res) => {
  fs.readFile("db.json", "utf8", (err, data) => {
    if (err) {
      console.log(err);
      res.status(500).send("Internal Server Error");
      return;
    }

    // console.log(req.body);
    const { todo } = req.body; // extracting the sent todo

    const jsonData = JSON.parse(data);
    const newId = getMaxId(jsonData.todos) + 1; // this function is defined in the utils file
    const newTodo = { id: newId, todo };

    jsonData.todos.push(newTodo);

    fs.writeFile("db.json", JSON.stringify(jsonData), (err) => {
      if (err) {
        console.log(err);
        res.status(500).send("Internal Server Error");
        return;
      }
    });

    res.status(200).json({
      todo: newTodo,
    });
  });
});
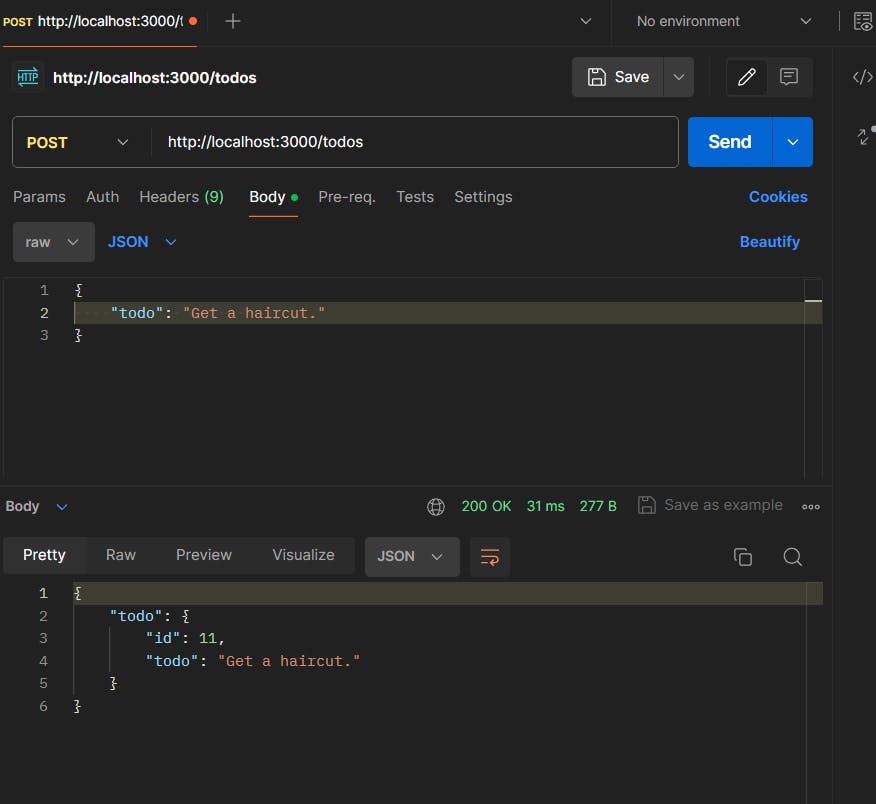
We cannot send post request to the server from the browser so we will the postman for the same.

Here we are sending a post request and in the body we are sending the todo as a json object and we get the response in the bottom half of the screen.
The db.json file also gets updated. We can check that in the file itself and also by making a get request in the browser.
Step 7 : Deleting a todo
To delete a todo we need to make a new delete route.
app.delete("/todos/:id", (req, res) => {
  const id = parseInt(req.params.id);

  fs.readFile("db.json", "utf8", (err, data) => {
    if (err) {
      console.log(err);
      res.status(500).send("Internal Server Error");
      return;
    }

    const jsonData = JSON.parse(data);

    const index = jsonData.todos.findIndex((todo) => todo.id === id);

    if (index === -1) {
      res.status(404).send("Not Found");
      return;
    }

    const deletedTodo = jsonData.todos[index];

    jsonData.todos.splice(index, 1);  // removing from the todos array

    fs.writeFile("db.json", JSON.stringify(jsonData), (err) => {
      if (err) {
        console.log(err);
        res.status(500).send("Internal Server Error");
        return;
      }
    });
    res.status(200).json({
      deletedTodo,
    });
  });
});
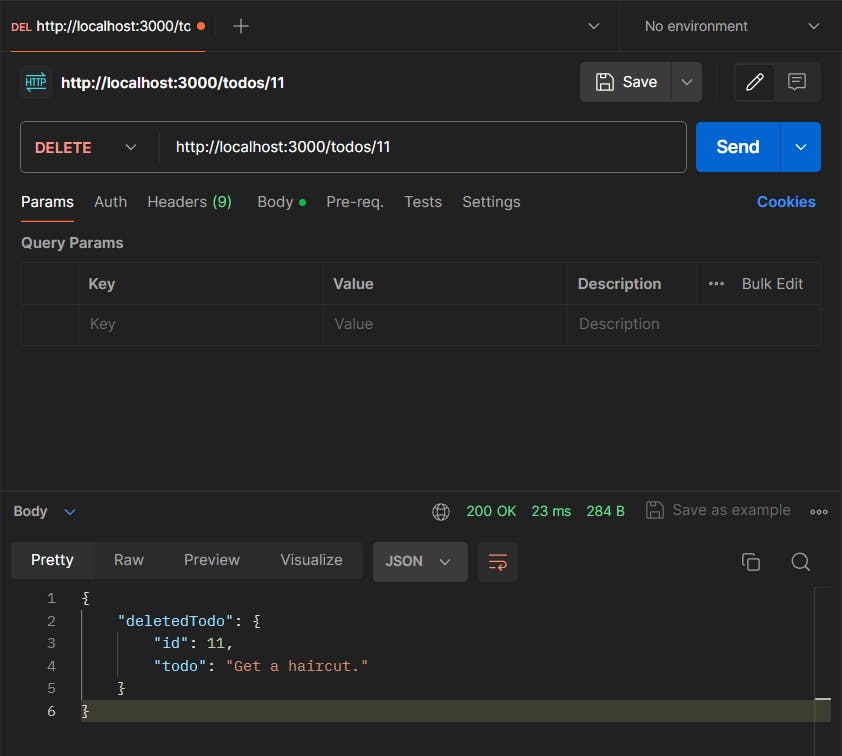
Here the route is "/todo/:id". This is a dynamic path that means the path can be "/todos/1" to delete the first todo or "/todos/6" to delete the sixth todo and so on. The 1 or the 6 is stored in the id variable which can be accessed like req.params.id.

Step 8 : Updating a todo
To update a todo we need to create put route. Here just like the delete route, the put route will also be dynamic and like the post route we need to send json object with new todo.
app.put("/todos/:id", (req, res) => {
  const id = parseInt(req.params.id);
  const { todo } = req.body;

  fs.readFile("db.json", "utf8", (err, data) => {
    if (err) {
      console.log(err);
      res.status(500).send("Internal Server Error");
      return;
    }

    const jsonData = JSON.parse(data);

    const index = jsonData.todos.findIndex((todo) => todo.id === id);

    if (index === -1) {
      res.status(404).send("Not Found");
      return;
    }

    const updatedTodo = {
      id: jsonData.todos[index].id,
      todo: todo,
    };

    jsonData.todos[index] = updatedTodo;

    fs.writeFile("db.json", JSON.stringify(jsonData), (err) => {
      if (err) {
        console.log(err);
        res.status(500).send("Internal Server Error");
        return;
      }
    });
    res.status(200).json({
      updatedTodo,
    });
  });
});
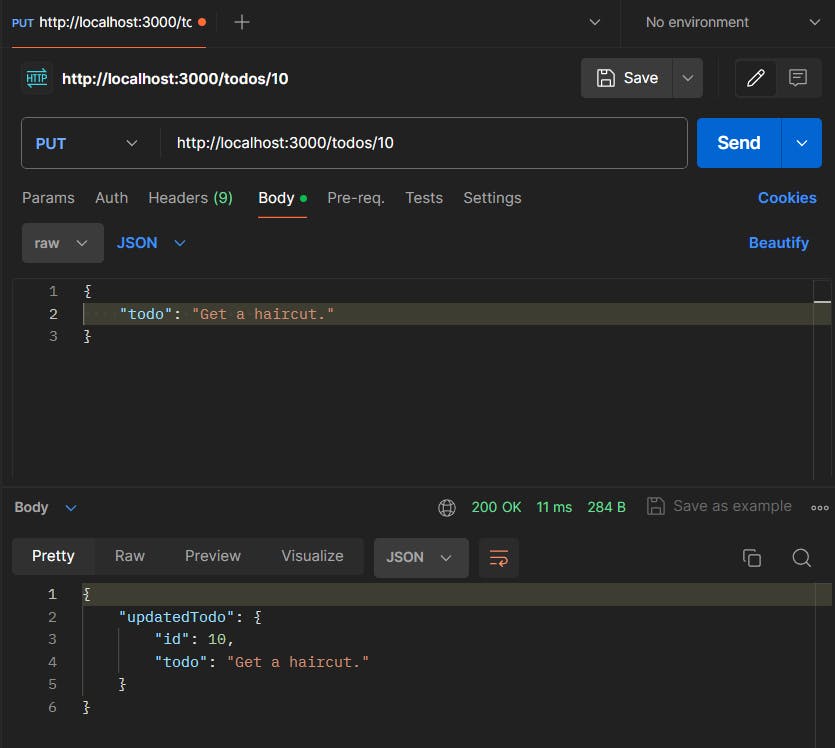
Here we are accessing the id from the params find the todo and replacing it with the new todo which is sent via the request body.

Previously the todo with the id of 10 was "Cook dinner." which was updated to "Get a haircut."
Conclusion
In conclusion, we've delved into the creation of a fundamental TODOs API using Node.js and Express, exploring the essential CRUD (Create, Read, Update, Delete) functionalities along the way. Through this journey, we've gained insights into structuring RESTful endpoints, handling HTTP requests, and managing data within our server. However, our exploration doesn't end here. For those eager to expand their understanding, delving into organizing a Node.js API using the Model-View-Controller (MVC) architecture presents an enriching next step. Additionally, exploring topics like middleware, authentication, data validation, and error handling can further refine your skills and empower you to create robust, production-ready APIs.
Connect with me on LinkedIn to stay updated on my latest projects and insights, or visit my Portfolio website to learn more about my work and expertise.
Thank you for joining me on this journey of building a basic API with Express and Node.js. I hope you found this guide helpful and insightful. Remember, the world of web development is vast and exciting, so keep exploring, learning, and building amazing things!
Happy coding! 🚀

